

How To Make Scale Patterns For Makeup
Tori is a 28-year-old, three-time animal mom and DIYer living in Northern Atlanta with her beau.
hellovictoria
I am ever i who is trying to think of unique costumes for Halloween. Now that my fellow and I have gotten into going to conventions like Dragon Con in Atlanta, I am also starting to go into the world of cosplaying. When I idea of this idea I was really trying to think of something unique I could do for the Halloween costume contest at work and then I could win some coin.
I had such a hard time trying to figure out what I wanted to exercise, but I did know my costume had to fulfill two requirements this year:
- It had to contain funky contacts.
- It had to involve unique makeup.
I'm really big into doing crazy makeup any time I have the opportunity. I piece of work office time at Ulta Beauty and so luckily I've had a lot of opportunity to experiment with looks I can wear to work, and I am able to exam many products to find the ones that work the all-time for whatever it is I'g looking for. Terminal year, I was able to pull off a Tron outfit using a black leather jacket from Goodwill that I made into a vest, EL wire, Black pleather leggings, some spray on hair color, and my Urban Decay Electric Palette. I wanted to exercise something like that, just fifty-fifty more fun!
I had some problem figuring out what I wanted to do for the costume and then I started past looking through my closet to see what dress I already had, because buying clothes for a costume tin get expensive. What did I accept that was already unique and would be great for a halloween costume?
I immediately spotted my holiday party wearing apparel from final twelvemonth and decided I wanted to utilize that somehow. The wearing apparel is knee length, 3/four sleeve, and covered in holographic blueish/green sequins. I idea, "that kind of looks similar scales. I should be a human lizard!" And from at that place I set out researching ways I could practice that.
Initially I thought I might just practise normal makup in a scaly design, because that would exist easy and wouldn't require any actress supplies. But I wanted the scales to look life like and 3D. How could I do that? Immediately I started doing some research.
Making the Prosthetic Scales
I started looking for means that I could hands make prosthetic scales at home. There are so many different ways to do it simply so many of them looked more complicated than I needed it to be. I stumbled upon a Youtube video from user Smearsmell which I accept linked beneath. This tutorial shows you how to make a mold out of plasticine clay that you can pour liquid latex into to brand your scales.
This ended upwards being an extremely handy tutorial for me! In the tutorial it says you will need plasticine dirt, liquid latex, and a push button or some other slice to assist yous make the pattern yous desire. I didn't have any spare buttons laying around, and I also wanted a more than textured scale. So when I bought my supplies, I ended up actually using the barrel of a cigarette lighter to brand my scale design.
Plasticine clay is a not bad clay to use for making DIY prosthetics because it is an oil based dirt that doesn't dry, then yous can re-mold information technology equally many times as you lot want without worrying about running out or messing up. The other nice thing is that liquid latex, once dry, peels right off of it.
As far every bit liquid latex goes, I used a few bottles from Spirit Halloween for this. There's no demand for high stop expensive latex in my opinion, because this worked simply fine. The only thing is that when used in layers, such as making a mold, this particular latex will dry a yellowish white and I knew that was going to be difficult to work with if I wanted to make them colorful, so I made mine unlike colors.
You can color your liquid latex using acrylic pigment, because acrylic paint in small quantities volition not affect the texture or drying ability of the latex. I poured the latex into two bowls. In one bowl I squeezed a drop of green acrylic paint, and in the other I squeezed a drop of blue acrylic paint, and mixed each together to get the coloring I was looking for.
I rolled my plasticine dirt out with a PAM spray can from my pantry because I couldn't detect my rolling pivot. I rolled it out in an oval section large enough to cover a significant porton of my face up. I pressed the butt of the cigarette lighter into the clay to course the scales.
Scroll to Continue
Read More From Holidappy
After I fabricated the mold, I placed information technology on a ceramic plate and using a paintbrush I painted a thick layer of latex onto the mold. I let this dry overnight and applied another coat of latex later on the first coat had completely dried. I did this 3 times, to ensure the latex was stiff enough and thick enough to support me peeling my scales off in one big piece without stretching them out.
This procedure worked perfectly and was exactly what I needed. I fabricated a few more molds just so I would have some pieces to work with for my scales. Considering of letting them air dry, it took about three days for the scales to exist ready to remove from the molds, though I'1000 sure you tin blow dry information technology to speed the procedure up.
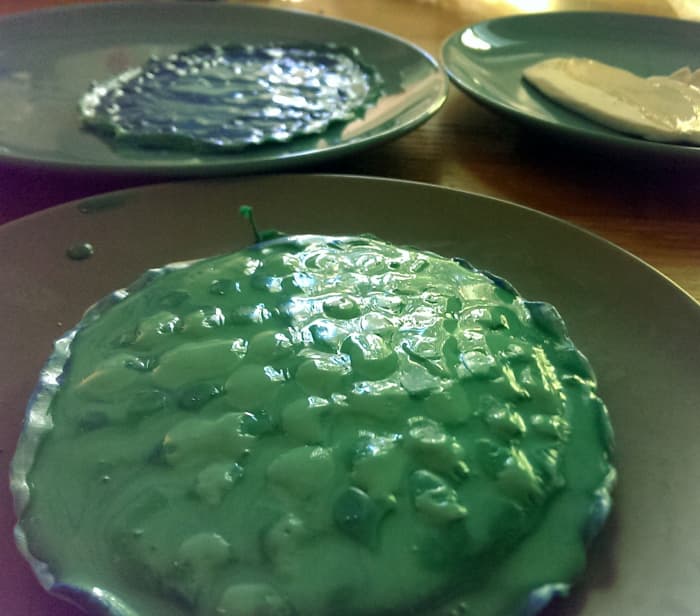
This is what my molds looked similar after 3 layers of latex. In this picture the third layer is drying. You lot tin run into that when I made the mold I left a little room around the scale pattern, making for skin off without stretching the scales out.
hellovictoria
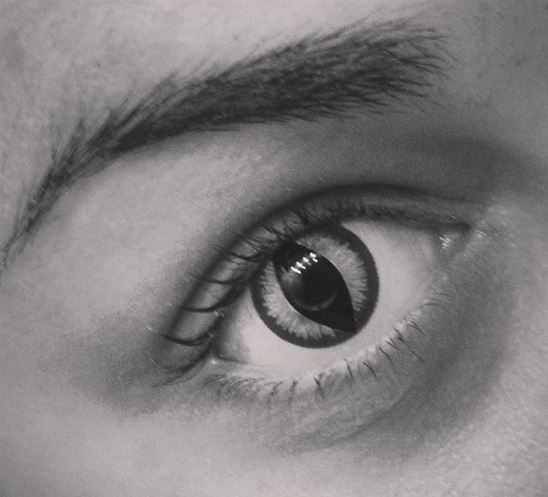
The lenses I got are "Banshee" by Gothika.
hellovictoria
1 of the master components of my costume for me was my special effect contacts. I used a red and xanthous lizard eye contact called "Banshee" made by the brand Gothika, which is an industry leader in special effects contact lenses.
If you don't live in a large urban center, it can exist difficult to find a dealer where yous tin pick the contacts upwardly directly. I had a lot of trouble with this as most of the places I found were online only, just said shipping might take up to 2 weeks, and I didn't have two weeks.
Luckily, I live in Atlanta, and so I was able to purchase my contact in person from the great people at Marietta Optometry (click that link to see what they offer). You tin buy contacts online from them as well as picking up in person if you lot live in the Atlanta Area. They likewise hand paint custom contact lenses in improver to selling the Gothika costume lenses. The people were so like shooting fish in a barrel to piece of work with and I highly recommend them!
The chief thing to be concerned about when ownership theatrical contact lenses is to make certain the lenses are FDA approved and that y'all have a prescription. The contact lens industry is heavily regulated and legit places will confirm on their website that their lenses are FDA canonical and they volition ask for a copy of your prescription before selling them.
Even if you take good eyesight and don't demand glasses or contacts on a regular ground you must take a prescription for them. If the location you are purchasing from is selling Gothika lenses, then y'all are safe because Gothika is FDA approved.
The downside of having bad eyesight similar me unfortunately is that yous will have a more than express selection of lenses to cull from if y'all absolutely need the vision correction. About theatrical lenses do not come with it so that can be a chip of a pain when trying to find the perfect contact. If you lot decide that you can live without the vision correction, and then you could get with the non-correcting ones.
The 1 thing I would have changed about my lizard costume was the point in which I put my contact in. I was stupid and waited until I had all of my prosthetics on and painted before putting my contact in. Terrible idea - it was much more difficult to get it in because I didn't desire to mess my makeup upwards. The other trouble is that costume contact lenses are oftentimes about a millimeter larger than normal contacts in lodge to fully embrace your irises, so you have to open your eye wider to put them in. This was difficult to do with the prosthetics on my face. Moral of the story: e'er put your contacts in start before applying anything to your face!
Adhering the Scales to My Skin
I did a test run on my arm earlier applying to my face to determine the best way to put them on and make sure they stay. Subsequently determining what I needed additional of to brand the costume a success, I went to the halloween store and returned back with some scar putty, more than latex, and gel faux blood.
I used a layer of liquid latex to adhere the scales the right side of my face. I cut pieces of scales to fit areas that were non covered by the largest scale piece, considering I didn't desire it to exist just 1 round area of my face that had scales on it, I preferred a one-half scaly look. After the scales were applied, I sealed the edges with more than latex past painting a layer on top of the prosthetic edges and pulling that layer onto my skin with each brushstroke.
The latex worked impressively well because my makeup had to stay on for 16 hours direct, merely I think there was withal a amend manner to do it. Past the finish of the 16 hours the pieces closest to my mouth and base of my neck were coming off because I was talking a lot and moving my cervix. Our Halloween was also a pretty warm day, and so towards the end of the prosthetics' run sweat was reducing the adhesiveness of the scales besides, but for the most function as long as it's a cooler day the sweat effect is non a problem.
If you lot decide to use liquid latex to adhere your prosthetics, use it on areas that are not equally prone to sweat, and proceed information technology away from trunk parts that will be moving a lot such as the base of operations of your cervix, near your mouth, wrists, elbows, hands, and ankles. The latex appears to pass with flying colors on parts of the body that don't need to move much - forearms, forehead, temple, shoulders, etc.
I did a trivial research on pare adhesives later this project and institute that in order to apply prosthetics to heavily moving parts, information technology would announced Pros-Aide Professional Medical Grade Adhesive is the all-time way to get. It has incredible staying power but you have to be very careful removing it or it could have some skin with information technology. To remove the adhesive y'all should buy the Pros-Aide Adhesive and Corrective Remover. According to the directions, you employ the agglutinative remover and allow it set, then information technology will come up correct off. Any residue left on your face, you lot will need to utilize more than of the remover and wipe it off. If you are attending a convention or a costumed event that will require you lot to have your makeup on for more than a few hours, this is definitely the manner to get as far as making sure sweat and movement don't bear on your prosthetic.
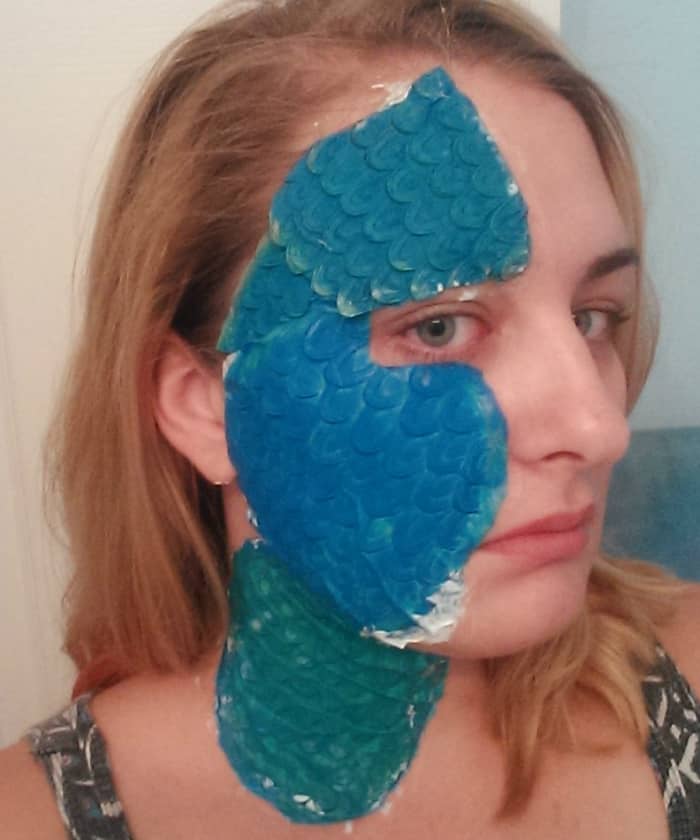
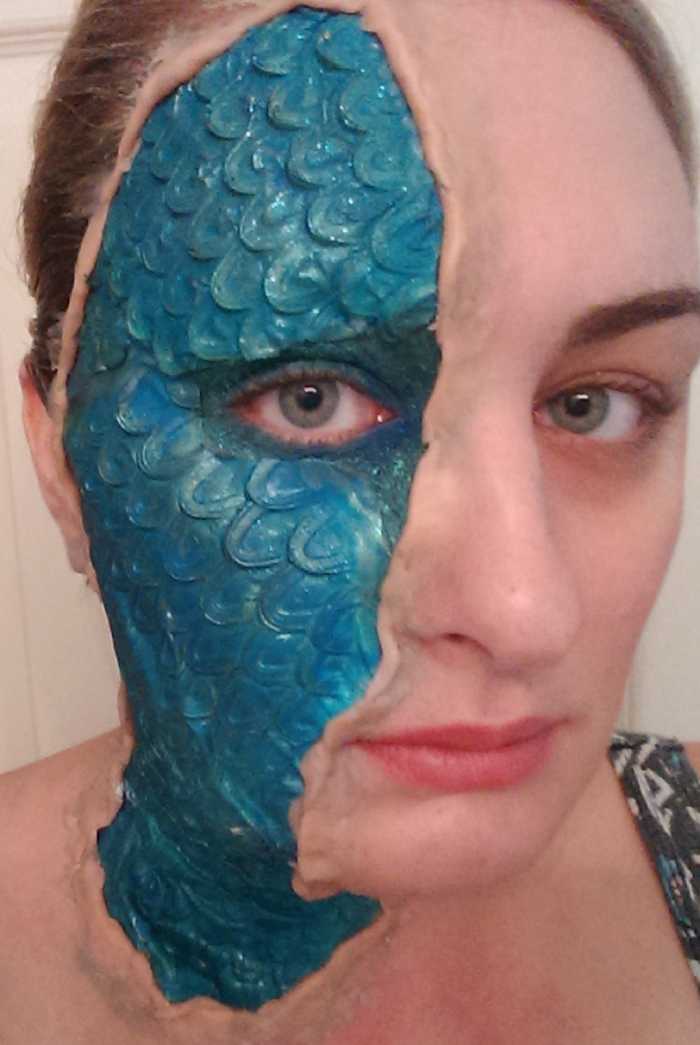
As yous tin can see it looks pretty impaired when you outset adhere the scales. don't be deterred - some makeup magic will assistance hide the individual pieces. Don't be agape to cut your prosthetics to fit.
hellovictoria

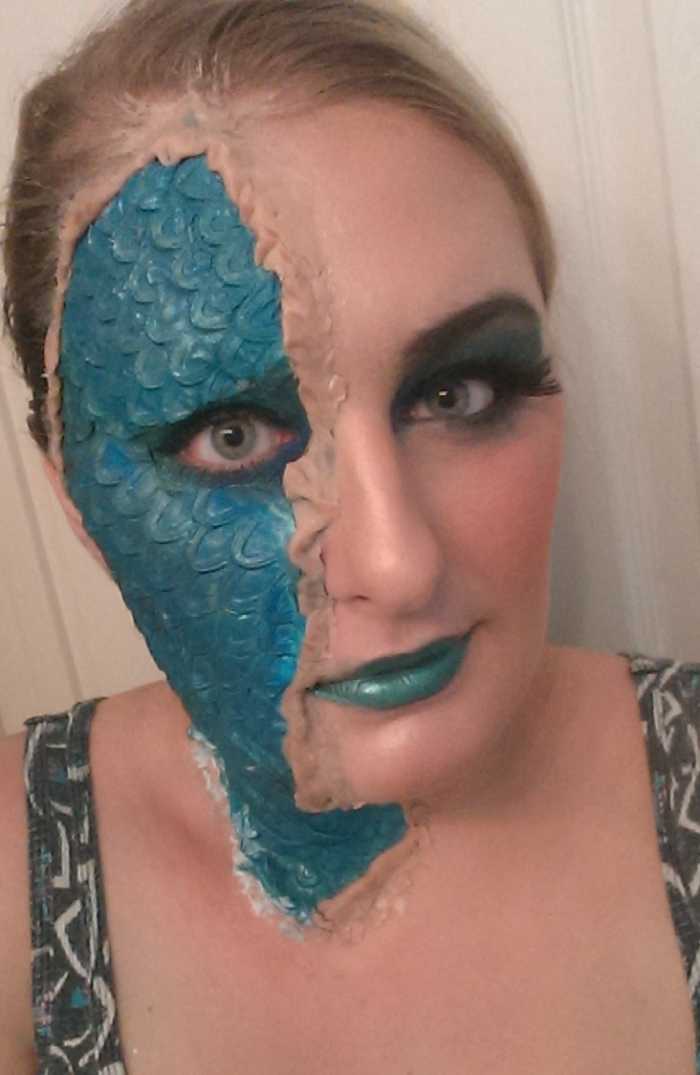
see, they look much better with some makeup on them!
hellovictoria
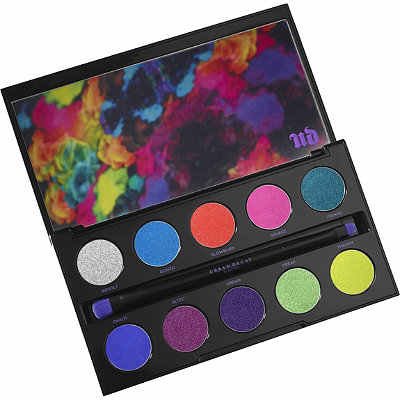
Urban Decay Electric Palette
Ulta Beauty
Applying Makeup to Alloy the Prosthetics In
When you first apply the prosthetics to your skin it will look pretty stupid. That's considering you tin can't but use prosthetics and be all fix to go! There are steps yous demand to take to alloy the prosthetic in with your skin to make information technology expect realistic, and the way to do this is with makeup.
For my prosthetics, I started by applying a confront primer to the scales with a makeup brush. I used a primer past Smashbox. I let the primer set a minute or two so that it wasn't completely moisture on my confront, and so I used the colors Fringe, Gonzo, and Chaos from the Urban Decay Electric Palette to add some color over summit of the prosthetic. After that powder was practical, I used the colors Lightyear and Vega from the Urban Decay Moondust Palette to make the scales look shimmery and cadger like. I didn't apply the colors in whatever sort of design - just all over, to even out the blues and greens from the prosthetic and brand the scales look more similar actual cadger scales.
For the parts of my skin not covered by a prostethic that I needed to blend in then that the scales looked as i cohesive piece, I applied an eyeshadow primer first. Eyeshadow primer is much stronger than a face primer since it'due south meant for eyelids which are constantly moving. I personally adopt Urban Decay Original Eyeshadow Primer Potion. After this primer was practical, I used a combination of the same palettes I used to colour the prosthetic and then that the makeup would blend well.
Before fake blood and finishing makeup, later applying imitation skin!
hellovictoria
Peeling Skin
The side by side step of the procedure for me was making my skin look similar it was peeling upwardly to reveal the scales. To practice this, I used scar wax (also known as scar putty). Using scar wax is in my opinion the least time consuming mode to make skin expect similar information technology's peeling.
I applied the scar wax by rolling it into a long slice and pressing it in effectually the edges of the prosthetic. I dragged the edge of the scar wax into my normal peel so that it faded gradually from pare to scarwax. Using the tip of a safety pivot I made "cracks" in the pare. For parts of the scar wax that were appearing to come up, I put a little liquid latex underneath to endeavor to adhere it a fiddling better.
This process took about 20 minutes to practice which was convenient and worked well for this costume. After the scar wax was applied, I advisedly practical foundation to it so that the coloring would blend to my skin a little meliorate. For the non-moving parts of my face up, this worked perfectly and didn't movement all day. But equally with using latex every bit an adhesive, towards the terminate of the mean solar day the parts nigh my mouth started to come off considering of me talking, eating and sweating. And equally always, in that location is a way to prevent that.
I found the video tutorial below by the Youtuber Kelsey Bobain showing a method of peeling skin with elmer's glue and layers of tissue. I recommend using latex instead of elmer's glue personally simply you lot could utilise either one. If you cull to do your prosthetics this manner (which I will adjacent fourth dimension), you lot will demand to apply the peeling peel showtime before applying the prosthetic. Once the skin is on, you lot will apply the prosthetic to your skin underneath the peeling peel and then use the makeup from at that place.
After the Makeup is applied!
hellovictoria
Applying the Rest of My Makeup
I just did one-half my face as a Lizard, so obviously the other side of my confront had to be fabricated up. Since this was a costume I wanted to go all out on the makeup. Here's what I used:
Face:
- Smashbox Photofinish Primer in Light
- Boots No. seven Beautifully Matte Foundation
- Tarte Cosmetics Colored Dirt CC Undereye Corrector in Light-Medium
Contour/Blush:
- Urban Decay Flushed Palette in Native (used bronzer and highligher only)
- It Cosmetics CC Radiance Ombre Blush in Coral Affluent
Optics/Eyebrows:
- Anastasia Forehead Definer Pencil in Soft Brown
- Urban Decay Original Eyeshadow Primer Potion
- Urban Decay Electric Palette (Colors Used: Fringe, Gonzo, Chaos)
- Urban Decay Naked 3 Palette (Color Used: Blackheart)
- Urban Disuse Moondust Palette (Colors Used: Lightyear and Vega)
- Stila Stay-All-Solar day Waterproof Liquid Eyeliner in Intense Black
- Urban Disuse Perversion Mascara
- Lashes by Spirit Halloween
Lips:
- NYX Cosmetics Cosmic Metals Lip Cream in Out of This World
The Finishing Affect: Fake Blood
There's merely something near simulated blood that is crawly when it comes to a costume like this. In add-on to covering any mistakes y'all may accept made, I feel like it actually ties the costume together. But non all fake claret is the aforementioned - particularly for long-wear costume makeup.
When I did my exam run, I practical a tube of false "vampire" claret from Party Metropolis. Merely this blood was messy, sticky, and got all over everything. I mean, I know I was using my holiday dress for a costume but I still wanted to be able to wearable it later on Halloween and not destroy information technology! So I went to Spirit Halloween and came back with gel blood.
You warm the bottle in a bath of boiling water for a few minutes, and it becomes a liquid. Once it's a liquid you tin apply information technology to your face up, only as information technology cools information technology turns back into a gel over again - giving y'all realistic looking bloody areas without the sticky mess of regular blood. For this costume the fake blood should be the terminal matter you put on.
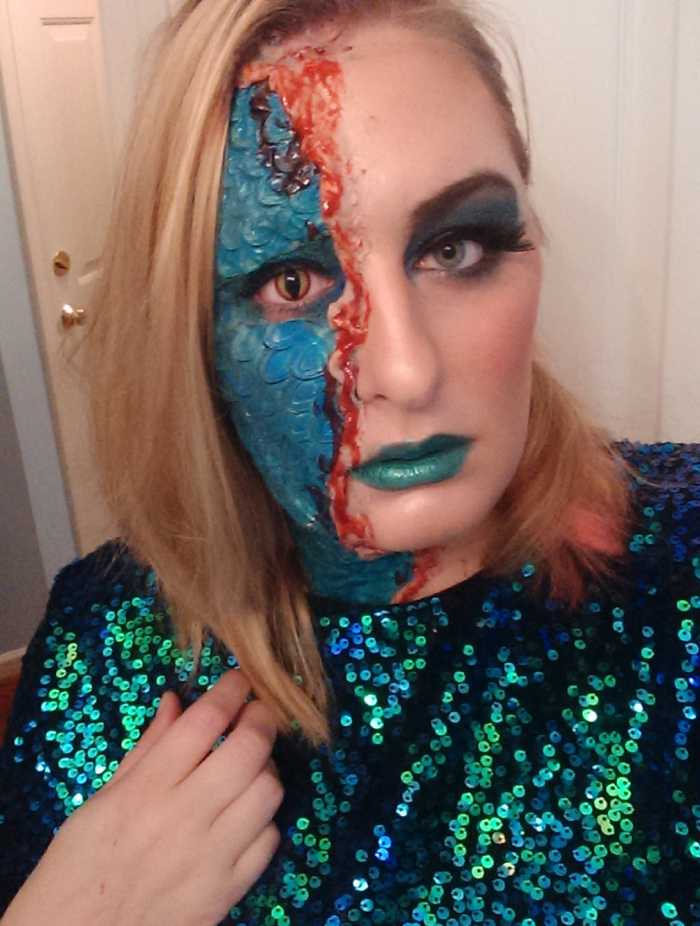
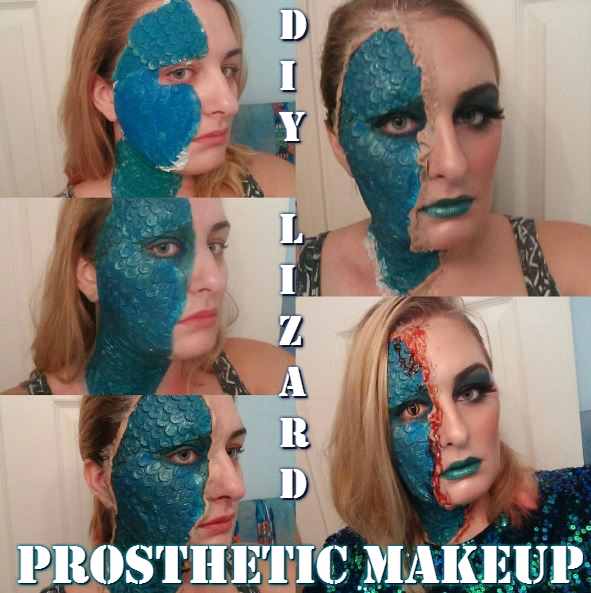
The finished product! I won $100 in a costume contest with this await!
Hellovictoria
Kathleen from Michigan on November 22, 2016:
It turned out astonishing!

How To Make Scale Patterns For Makeup,
Source: https://holidappy.com/costumes/Makeup-DIY-Special-Effects-Lizard-Mystique-Prosthetic
Posted by: boldendeppoccanot.blogspot.com
0 Response to "How To Make Scale Patterns For Makeup"
Post a Comment